Wednesday, January 30, 2019

Hi there!

Hi friends!

Today, as I was browsing the internet I came across Tuesday Morning Sketches. Their sketch caught my eye and decided to play along. 


This was the sketch that I used for my card
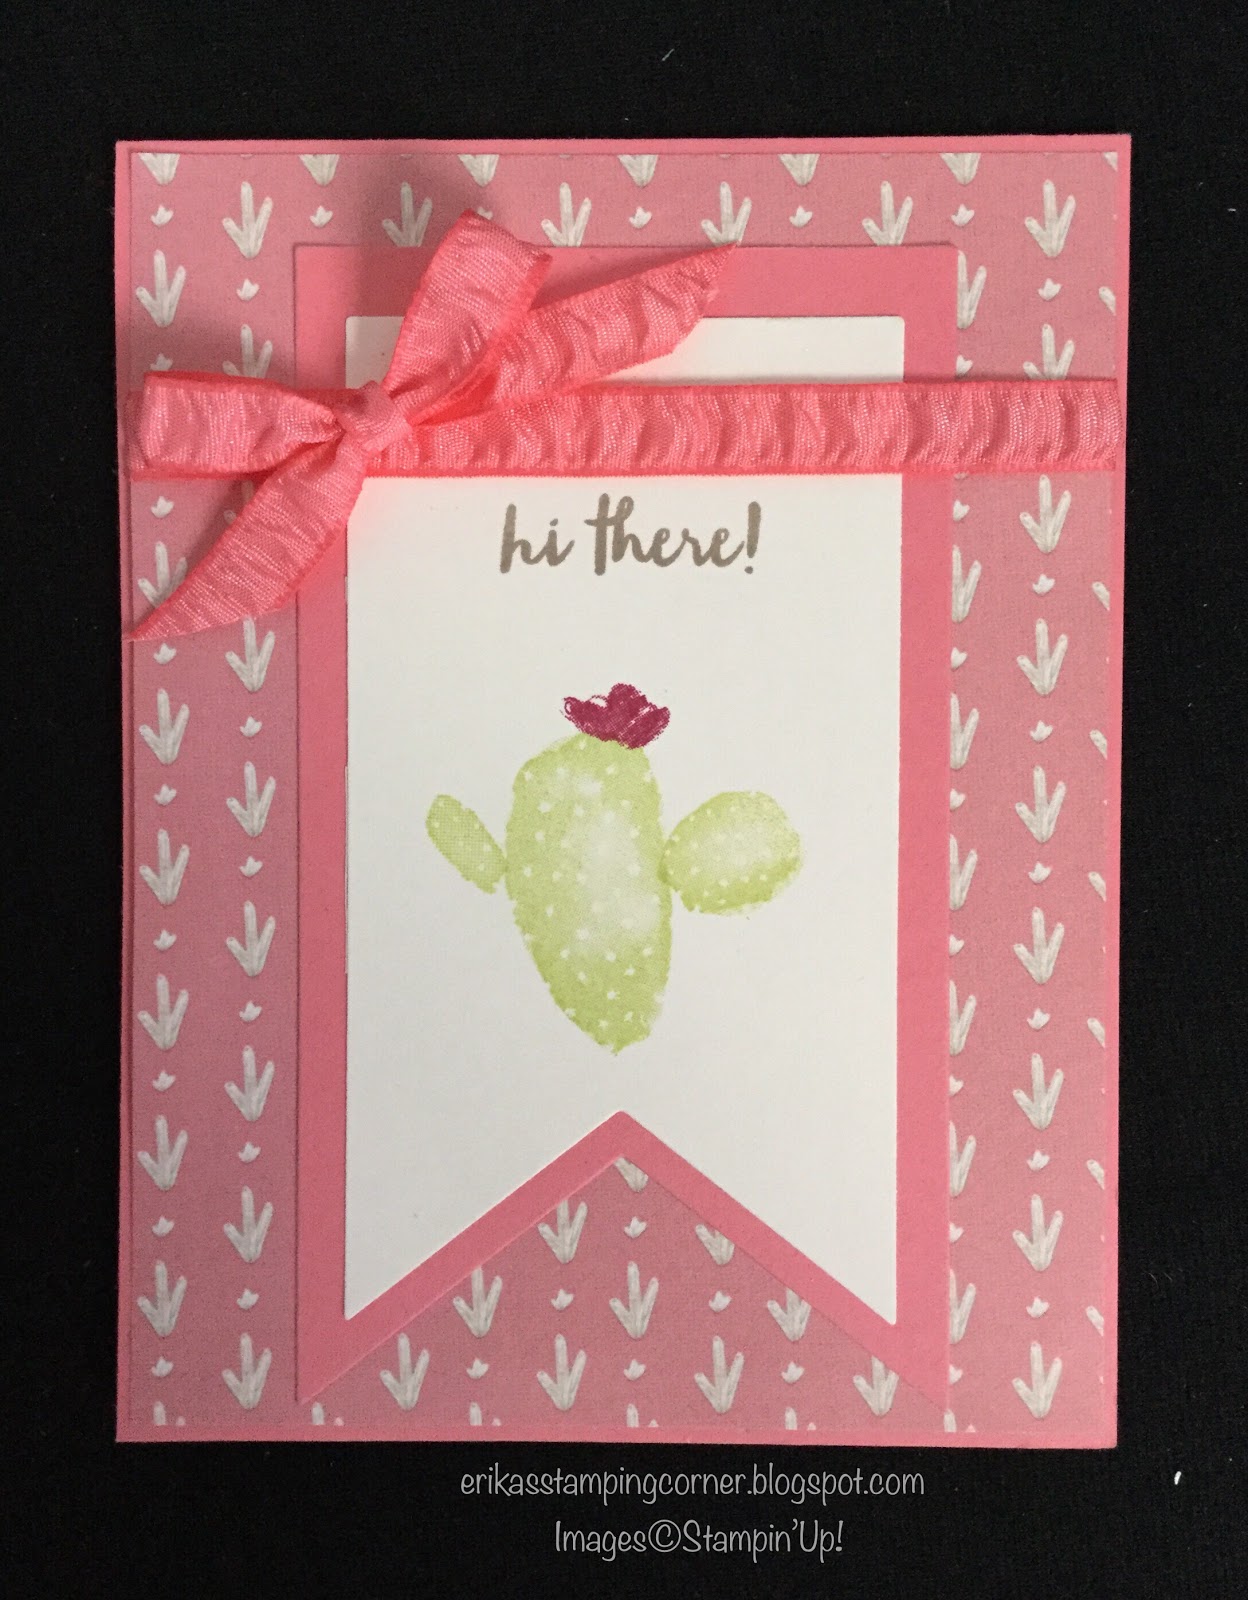

And here’s my card! 

I started by stamping the image and sentiment on Very Vanilla cardstock. I then die cut it using the retired Stampin’ Up Banners Framelits and adhered it onto a piece of Flirty Flamingo cardstock, which was also cut using the retired Banners Framelits.

Then, as I was going through my DSP looking for a background, I discovered this sheet! I was so excited...it kinda looked like my stamped cactus! Wouldn’t you agree? This sheet of DSP is from the Needlepoint Nook DSP.

I adhered the banner to the DSP, wrapped a piece of retired Flirty Flamingo Ruched Ribbon over the paper. After, I adhered the paper to the Flirty Flamingo card base. Using glue dots I adhered a bow over the ribbon.


I also stamped a cactus on the envelope.

Hope you like today’s card.

Erika

Stampin’ Up Materials:
Paper - Flirty Flamingo Cardstock, Very Vanilla Cardstock, Needlepoint Nook DSP
Stamp Set - Flowering Desert
Ink - Lemon Lime Twist, Lovely Lipstick, Crumb Cake 
Embellishments - Flirty Flamingo Ruched Ribbon (retired)
Tools - Banner Framelits Dies (retired), Big Shot, Multipurpose Liquid Glue, Stampin’ Up Glue Dots
Other - Very Vanilla Medium Envelope 


Tuesday, January 29, 2019

You Otter Be My Valentine

Hello friends!

This week’s CASE-ing Tuesday #184 sketch inspired me to create this Valentine’s Day card. I used the Hey Love Stamp Set, from the SU 2019 Occasions Catalog. All the animals are so cute I couldn’t decide which to use. In the end, I decided to use the otter, as it had a coordinating sentiment.   


I started by stamping the otter in Whisper White cardstock in Memento Tuxedo Black. I colored him using the light Crumb Cake Stampin’ Blend and outlined him with the dark Crumb Cake Stampin’ Blend. The little heart was colored using the light Poppy Parade Stampin’ Blend and the outside of the heart and water waves with light Pool Party Stampin’ Blend. Then, I die cut it using the large stitched circle framelit.


Using the measurements provided on the sketch, I cut all my layers. The first layer, the All My Love DSP, was cut 1/8” smaller than the card base and mounted to the Lovely Lipstick card base. Then, I wrapped some 1/8” Lovely Lipstick Mini Grosgrain Ribbon around the Soft Seafoam cardstock and
adhered it to the card front with Mini Dimensionals. The next layer, the DSP, was adhered on top of
the Soft Seafoam cardstock with Mini Dimensionals. Then, I added a bit of liquid glue to the bottom back of the otter and some Mini Dimensionals and adhered it to the card base.


I stamped the sentiment in Lovely Lipstick, on Blushing Bride cardstock. I adhered it to the card front with Mini Dimensionals. I added the bow and some Heart Epoxy Droplets that I colored using the Dark Real Red Stampin’ Blend.


This is the card for today’s CASE.


And here is the sketch for the CASE.

I hope you enjoyed today’s card and that it inspired you to create some Valentine’s Day cards.
Thanks for stopping by.


Erika


Stampin’ Up Materials:
Paper - Blushing Bride Cardstock, Lovely Lipstick Cardstock, Soft Seafoam Cardstock,  All My Love DSP
Stamps - Hey Love 
Ink - Lovely Lipstick, Light/Dark Crumb Cake Stampin’ Blend, Light Poppy Parade Stampin’ Blend, Light Real Red Stampin’ Blend, Light Pool Party Stampin’ Blend 
Tools - Stitched Framelits Dies, Big Shot, Mini Dimensionals, Multipurpose Liquid Glue 
Embellishments - 1/8” Lovely Lipstick Grosgrain Ribbon, Heart Epoxy Droplets 


Wednesday, January 23, 2019

Wishing You Well


Hello friends!

Couple days ago I came across Fab Friday Challenge Blog. Their challenge was a sketch. I liked the sketch and decided to take on the challenge.


Here’s the sketch that was provide.


And here’s my take on the sketch.

I knew I wanted to used the tea cup stamp from the Tea Together Stamp Set, in the Occasions Catalog. The stamp set coordinates with the Tea Time Framelits Dies. These dies are part of the SAB rewards and earned for free with a $100 purchase, before taxes. And this whole stamp/die set pairs perfectly with the Tea Room Specialty DSP, in the Annual Catalog.

I started by adhering the Tea Room Specialty DSP to a piece of Crushed Curry Cardstock. Then, wrapped a piece of Gold  Metallic Edge Ribbon around the layer. This layer was then adhered to the Blackberry Bliss card base. 


I then stamped the tea cup on Very Vanilla Cardstock using Memento Tuxedo Black and used the coordinating die to cut it. Then, I stamped the rose and leaf. I colored the stem and leaf using the Mint Macaron Stampin’ Write Marker. With the light Petal Pink Stampin’ Blend I colored the roses and then outlined them with the dark Petal Pink Stampin’ Blend. With the light Crumb Cake Stampin’ Blend, I outlined the tea cup and saucer and went over it using the light Petal Pink Blend. I adhered the tea cup to the card front with Mini Dimensionals. On Very Vanilla, I stamped the sentiment Wishing You Well from the stamp set Lasting Lily, in Blackberry Bliss, (this stamp set is also part of the SAB rewards). I adhered it to the card front with Mini Dimensionals and added a Gold Faceted Gem. I finished the card by adding a bow on the side of the tea cup.

Hope you like today’s card, I enjoyed the challenge. 

Erika


Measurements:
Card base - 5 1/2” x 8 1/2 scored at 4 1/2”
Crushed Curry - 5 1/2” x 3 1/8”
DSP - 5 1/2” x 3”
Very Vanilla Banner - 3 1/4” x 1/2”


Stampin’ Up Materials:
Paper -  Blackberry Bliss, Crushed Curry, Very Vanilla, Tea Room Specialty DSP
Stamps - Tea Together, Lasting Lily (SAB)
Ink - Blackberry Bliss, Memento Tuxedo Black, Mint Macaron Stampin’ Write Marker, Light/Dark Petal Pink Stampin’ Blend, Light Crumb Cake Stampin’ Blend 
Tools - Tea Time Framelits (SAB), Big Shot, Multipurpose Liquid Glue, Mini Dimensionals 
Embellishments- 3/8 Gold Metallic-Edge Ribbon, Gold Faceted Gem


Tuesday, January 22, 2019

Make It A Sweet Celebration


Hi there, it’s CASE-ing Tuesday! 
CASE-ing Tuesday #183, where we chose a card from a current Stampin’ Up Catalog and CASE (copy) by changing a little, a lot, or nothing at all, and now with sketches.

Today we’re having a sweet celebration with the Sweetest Thing Stamp Set and coordinating How Sweet It Is DSP. I just love this set...bright, colorful and oh so yummy! It is available in the 2019 Occasions Catalog.


I started with Gorgeous Grape Cardstock for the card base. Then, the first layer is from the DSP and adhered to the card base. Then I cut a piece of the gummy bear paper at 3 3/8’’ x 4 3/4”. Now, using the 3 3/8” x 4 3/4” and the 3” x 4 3/8’’ Rectangle Stitched Framelits Dies, I die cut a frame to go over the gummy bear paper. The frame is adhered to the gummy paper with liquid glue. This is then adhered to the card front with Stampin’ Dimensionals.


The DSP pack has a sheet with candy jars that can be die cut using the Jar Of Sweets Framelits Dies - they coordinate with the stamp set and can be bought as a bundle to save 10%. 
I cut two jars, adhered one to the Whisper White Cardstock. The circle was die cut using the largest circle from the Stitched Shapes Framelits. The other jar was adhered with Mini Dimensionals. Then, the circle was adhered to the gummy paper using Mini Dimensionals.  On a piece of Bermuda Bay Cardstock, I embossed the sentiment using White Stampin’ Emboss Powder, snipped one end, and adhered to the card front using Mini Dimensionals.


As you will see, my card this week is exactly like the card that was CASEd this week. I just changed the colors and paper.


Here’s the card being CASEd this week along with the sketch. I hope you’ve enjoyed today’s card. I enjoyed creating it. Join us at 
CASE-Iing Tuesday Facebook Group  and share your CASEd card with us, we love to see it!
Thanks for visiting!

Erika


Stampin’ Up Materials:
Paper - Gorgeous Grape Cardstock, Bermuda Bay Cardstock, Whisper White Cardstock, How Sweet It Is DSP
Stamps - Sweetest Thing Stamp Set 
Tools - Rectangle Stitched Framelits Dies, Stitched Shapes 
Framelits, Jar Of Sweets Framelits, Big Shot, Multipurpose Liquid Glue, Stampin’ Dimensionals, Mini Dimensionals, White Stampin’ Emboss Powder, Embossing Buddy, Versamark, Heat Gun
Other - Medium Whisper White Envelope 


Monday, January 21, 2019

P.S. I Love You


Happy Monday!
Today I have a non traditional Valentine’s card for you...no red, pink hearts. I chose to use the P.S. You’re The Best Stamp Set. The sentiments in the set are perfect for a Valentine’s card. Hope you like it.


I started by stamping the typewriter on a scrap of Whisper White Cardstock in Memento Tuxedo Black. Then, I colored it using Stampin’ Blends, fuzzy cut it, and stamped the sentiments in Grapefruit Grove.


Then I die cut the Whisper White layer using the largest Rectangle Stitched Framelits Dies. I stamped the background image a couple times in different directions, in Pool Party. The sentiment in Grapefruit Grove (Meant To Be Stamp Set). I then wrapped a piece of Grapefruit Grove Organdy Ribbon (SAB reward). I adhered this to the first layer, Pool Party Cardstock, with liquid glue. Then I adhered it to the Thick Whisper White card base using Stampin’ Dimensionals. I then adhered the typewriter to the card front using Mini Dimensionals. To finish the card, I die cut the hearts using the Be Mine Stitched Framelits Dies. Since the piece was bigger than what I wanted, I snipped them to the size I needed. Carefully, I added some liquid glue to the back of the hearts and adhered it behind the typewriter.


I hope you enjoyed this non traditional Valentine’s card. Let me know what you think.


I used the sketch from Freshly Made Sketches as inspiration. Thank you for stopping by, have a wonderful day.

Erika 


Stampin’ Up Materials:
Paper - Thick Whisper White Cardstock, Whisper White Cardstock, Pool Party Cardstock, Grapefruit Grove Cardstock 
Stamps - P.S. You’re The Best, Meant To Be 
Ink -  Memento Tuxedo Black, Grapefruit Grove, Dark Pool Party Stampin’ Blend, Light/Dark Smoky Slate 
Tools - Be Mine Stitched Framelits Dies, Rectangle Stitched Framelits Dies, Big Shot, Multipurpose Liquid Glue, Stampin’ Dimensionals, Mini Dimensionals
Embellishments - Grapefruit Grove Organdy Ribbon 


Sunday, January 20, 2019

Beautiful Promenade

Happy Sunday, friends!

My card today features the Beautiful Promenade Stamp Set. I decided to keep it neutral by using Crumb Cake Cardstock/Ink and Very Vanilla Cardstock.


The first layer, Very Vanilla Cardstock, I stamped the diamond image using the Stamparatus and adhered it to the Crumb Cake card base. Then, on another Very Vanilla piece of cardstock, I stamped the flowers and sentiment. This piece of Very Vanilla was adhered to a piece of Crumb Cake Cardstock. I added some Gold Metallic Thread behind this piece with some glue dots and adhered it to the card front using Stampin’ Dimensionals.


On a scrap of Very Vanilla Cardstock I stamped the flower image (flower for top corner) and used the coordinating Beautiful Layer Thinlits to die cut it. I used a little bit of  Tombow Multipurpose Liquid Glue to adhered it.


The inside of the card is stamped with the flower image and a sentiment from the Beautiful Promenade Set. And finished the card by lining the envelope with a matching Neutral DSP.


Today’s card was inspired by the sketch challenge over at Sunday Stamps.  Hope you enjoyed today’s card. Enjoy the rest of your day, thanks for stopping by,

Erika


Stampin’ Up Materials:
Paper - Crumb Cake Cardstock, Very Vanilla Cardstock, Neutrals DSP
Stamp - Beautiful Promenade 
Ink - Crumb Cake 
Tools - Beautiful Layers Thinlits, Big Shot,  Stamparatus, Tombow Multipurpose Liquid Glue, Stampin’ Dimensionals,
Embellishments - Gold Metallic Thread
Other - Very Vanilla Medium Envelope


Tuesday, January 15, 2019

Darling Baby


Hi there, happy Tuesday! 
Welcome to CASE-ing Tuesday #182, where we chose a card from a current Stampin’ Up Catalog and CASE (copy) by changing a little, a lot, or nothing at all, and now with sketches.

My card today features the new stamp set Fable Friends, from the 2019 Occasions Catalog. The set is adorable and great for different occasions. I never seem to have a baby card, so I decided to use it for one. The card is perfect in welcoming a sweet, precious baby and all the different pastel colors make it perfect for either a baby boy or girl.


I used Soft Sea Foam Cardstock for the card base. Then, using the measurements from the sketch I cut the two largest layers. The largest in Pool Party, the second largest I used the Subtles DSP in So Saffron and for the last layer I used Whisper White Cardstock and cut it with largest stitch square. On the Whisper White piece I stamped the cute bunny in Memento Black and colored him using the blends. I adhered my layers with liquid glue, making sure not to add glue to the one side that stuck out. Now, using the Layering Circle Framelits Dies I cut the circles - 1 3/8 circle in Whisper 
White and 1 3/4 scalloped circle in Petal Pink, and stamped the sentiment on the white circle. The sentiment is from the same stamp set as the bunny. I adhered them with liquid glue. Using glue dots I adhered a piece of Whisper White Polka Dot Tulle Ribbon and Daffodil Delight Organdy Ribbon ( a Sale-A-Bration reward).


I adhered the circle to the corner of the bunny layers with some 
liquid glue.


Then, with Mini Dimensionals I adhered the piece to the card base and added a sequins from the new Gingham Gala Adhesive Backed Sequins to finish the card.


Here is  the card being CASEd along with the sketch. 
I hope you have enjoyed this week’s CASE. Head ove to CASE-ing Tuesday Facebook Group to see how others got inspired and make sure you share you’re CASE with us.

Thanks for stopping by, have a great day!

Erika

Stampin Up Materials:
Stamp Set - Fable Friends (Occasions Catalog)
Paper - Sea Foam Cardstock, Pool Party Cardstock, Powder Pink Cardstock, Whisper White Cardstock, Subtles DSP So Saffron 
Ink - Pool Party, Memento Tuxedo Black, Light/Dark Crumb Cake Stampin’ Blends, Light/Dark Daffodil Delight 
Tools - Layering Circles Framelits, Stitched Shapes Framelits, Big Shot
Embellishments - Whisper White Polka Dot Tulle Ribbon,  Daffodil Delight  Organdy Ribbon (Sale-A-Bration item), Gingham Gala Adhesive-Backed Sequins
Adhesives - Multipurpose Liquid Glue, Mini Dimensionals 


Monday, January 14, 2019

Purple Butterflies


Hello friends! Happy Monday!
Wanted to start the week by sharing a card with you. 


Today’s card features the Botanical Butterflies DSP and Organy Ribbon from the Sale-A-Bration Brochure. You can earn one of these items for free with a $50 purchase (before taxes) or both with a $100 purchase (before taxes). 

 This DSP has lovely pattern sheets of paper, it was difficult to choose which to use. Finally, I decided on this black and white sheet. I used the 4th largest Rectangle Stitch Framelits Die to cut a 
piece of the DSP. Then, I decided to color the butterflies with the Stampin’ Blends. Once done coloring set aside.


I used Basic Black Cardstock for the card base. For the first layer I used another piece of Basic Black Cardstock, slightly smaller then the card base. Then, I heat embossed the sentiment and wrapped three pieces of ribbon around the first layer. I adhered the first layer to the card base using some 
liquid glue. I cut another piece of Basic Black Cardstock using the 3rd largest Rectangle Stitch 
Framelits Die. I then adhered the DSP to this pice. Once adhered, I adhered it to the card using Mini Dimensionals. 


To finish the card I stamped the inside of the card.

I hope you’ve enjoyed today’s card. If you have any questions feel free to ask. Thanks for stopping by. Have a wonderful day.
Erika

Stampin’ Up Materials:
Butterfly Gala Stamp Set 
Basic Black Cardstock 
Whisper White Cardstock 
Light/Dark Highland Heather Stampin’ Blends
Light/Dark Rich Razzleberry Stampin’ Blends 
Highland Heather Inkpad
Memento Tuxedo Black Inkpad
VersaMark Pad
Embossing Buddy
White Stampin’ Emboss Powder
Heat Tool
Rectangle Stitched Framelits Dies
Big Shot
Multipurpose Liquid Glue 
Mini Dimensionals 


Stampin’ Up Materials From the Sale-A-Bration Brochure:
Botanical Butterflies DSP
Organdy Ribbon-Highland Heather 


Saturday, January 12, 2019

I’m Here For You - Beautiful Promenade


Hello friends!

It’s a rainy day in my neck of the woods, so it’s a perfect day to make some cards. I decided in using a set that I have not used before, Beautiful Promanade Bundle.


I started with a Grapefruit Grove card base. I used Whisper White Cardstock for the first layer. On another piece of Whisper White Cardstock I stamped two of the full flower image in Grapefruit Grove. Then, in Calypso Coral I stamped the outline flower image over the full flower images. I also stamped two leaf images in Granny Apple Green. I cut them out using the coordinating Thinlits dies.


Using a bit of Multipurpose Liquid Glue I adhered a leaf behind each flower. Before adhering the flowers to the card, I stamped the sentiment in Memento Tuxedo Black. 


Then with Mini Dimensionals I adhered one flower to each corner. 
When adhering the flowers to the card make sure they stay inside the card frame or else the envelope will not close once the card is inside.


Inside the card, I stamped a flower and sentiment.

I used the sketch from Freshly Made Sketches as inspiration.
The card is so simple, clean and perfect to let someone know you’re there for them. I hope you’ve enjoyed today’s card.
Have a wonderful weekend!

Erika

Stampin’ Up Materials:
Beautiful Promenade Bundle 
Grapefruit Grove Cardstock 
Whisper White Cardstock 
Grapefruit Grove Inkpad
Granny Apple Green 
Memento Tuxedo Black 
Multipurpose Liquid Glue 
Mini Dimensionals 
Big Shot


Tuesday, January 8, 2019

Bella, You Make Me Happy


Hello friends!

Welcome to CASE-ing Tuesday, where we choose a card from a current Stampin’ Up! Catalog and CASE (copy) by changing a little, a lot or nothing at all. And to make it easier, a sketch is provided.


My card today features the cute little pup from Bella and Friends Stamp Set. This set can be found on page 30 of the Annual Catalog. I started by stamping the doggie in Memento Tuxedo Black on Whisper White Cardstock. I used the blends to color it. Then, I used one of the layering circles framelits to cut it. On Whisper White Cardstock I stamped the sentiment and cut it with one of the hearts from the new Be Mine Stitch Framelits Dies.


I used Flirty Flamingo Cardstock for the card base. The second layer is from the All My Love DSP, in the 2019 Occasions Catalog. On the third layer I used the Scattered Sequins EF.  I punched the banner  and adhered it to the back of the circle. Then, I adhered this to the other layers using Mini Dimensionals. Finally, I adhered the heart to the card using Mini Dimensionals.


This week’s CASE is from our Sale-A-Bration Catalog. It features the cute froggy stamp that you can earn for free, with a $50 purchase.


Here’s the sketch with measurements. This makes the CASE so much easier.

I hope you’ve enjoyed today’s card and that it inspires you. Share your CASE with us over at
CASE-ing Tuesday Facebook Group. Thank you for stopping by.

Erika


Stampin’ Up Materials:
Flirty Flamingo Cardstock 
Lovely Lipstick Cardstock 
Crumb Cake Cardstock 
Whisper White Cardstock 
All My Love DSP
Lovely Lipstick Inkpad 
Memento Tuxedo Black Inkpad
Light/Dark Crumb Cake Blends
Light Real Red Blends
Triple Banner Punch
Be Mine Stitched Dies
Layering Circle Framelits 
Scattered Sequins EF
Big Shot
Multipurpose Liquid Glue 
Mini Dimensionals 

Friday, January 4, 2019

FMS #369

Hello friends!

The paper in today’s card has such a beautiful print and colors that only a little stamping was needed. I wanted the paper to stand out.


I started with Thick Whisper White Cardstock for the the card base. For the first and second layer I used the new Stitch Rectangle Framelits (I’m so happy that SU has made these available). I adhered the second layer to the first with some liquid glue. Then, I adhered them to the card base with some Mini Dimensionals. After that, I cut a a stitched circle in vellum paper and stamped it. Be very careful when stamping as the ink might smear. Then I stamped the sentiment onto Whisper White Cardstock and cut it out using the frame thinlit from the Petals and More Thinlits Dies. Using some liquid glue I adhered a piece of ribbon behind the sentiment. Then the vellum piece was adhered to the ribbon and sentiment with some liquid glue. Finally, this was adhered to the card with Dimensionals and color pearls were added to finish the card. 


Here’s a closer look at the stitched paper and stamped vellum. 
I think this makes a great birthday card or even a Mother’s Day card - just change the sentiment.


I used the sketch by Freshly Made Sketches for inspiration. 
Hope you’ve enjoyed today’s card. Thank you for stopping by.

Erika


Stampin’ Up Materials:
Thick Whisper White Cardstock 
Whisper White Cardstock 
Coastal Cabana Cardstock 
Tea Room Specialty DSP
Vellum Cardstock 
Petal Palette  Stamp Set 
Rectangle Stitched Framelits Dies
Stitched Shapes Framelits Dies
Petals and More Framelits Dies
Rich Razzleberry Inkpad
Rich Razzleberry Velvet Ribbon
Share What You Love Artisan Pearls
Big Shot
Mini Dimensionals 
Dimensionals 

Tuesday, January 1, 2019

CASE-ing Tuesday #180

Hello Friends, Happy New Year!

Welcome to CASE-ing Tuesday #180! Where we choose a card from a current Stampin’ Up! Catalog and CASE (copy) by changing a little, a lot or nothing at all. Also, new this year, our CASE-ing Tuesday Facebook Group has added sketches to the CASE. I love this idea! This makes the CASE so much easier.


This is the card being CASE’d. It features the Tropical Chic Stamp Set.

Here’s the sketch with measurements. It doesn’t have to be followed exactly, as you’ll see in my card. It is being provided to make your card making easier.


My card starts with a Lovely Lipstick card base. Then, I wrapped a piece of Lovely Lipstick Ribbon around the Soft Sea Foam Cardstock and adhered it to the card base. I stamped my sentiment in Lovely Lipstick.


Then, I cut three pieces of the All My Love DSP, using the smallest square stitched framelits. I then adhered them to scallop squares slightly bigger in Lovely Lipstick cardstock. These squares were adhered using Mini Dimensionals.


To finish the card, I adhered a piece of coordinating DSP to the flap of the envelope...As you can see, I added the ribbon to my card, so I didn’t really stick to the sketch and you don’t either. Use it to help you make it your own.

I hope you enjoyed today’s card. Join us over at CASE-ing Tuesday Facebook Group and share your CASE with us. Thank you for stopping by and Best Wishes for 2019!

XOXO
Erika 

Stampin’ Up Materials:
Lovely Lipstick Cardstock 
Soft Sea Foam Cardstock 
All My Love DSP
Meant To Be Stamp Set 
Lovely Lipstick Inkpad 
Layering Square Framelits 
Stitched Framelits Dies
1/8” Lovely Lipstick Grosgrain Ribbon
Multipurpose Liquid Glue 
Mini Dimensionals 
Medium Whisper White Envelope 
Big shot